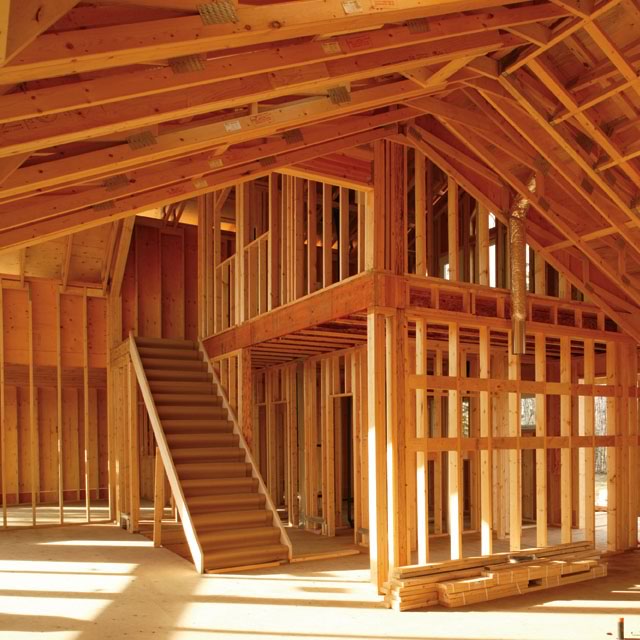
There is one afternoon in a custom build when the house tells you the truth about itself. The framing is up, the roof is on, and the wiring, plumbing and ductwork are all in — but nothing is covered yet. That is the pre-drywall walkthrough, and it is the last time every decision you made on paper is visible, checkable, and cheap to change.
After the boarders arrive, the same change costs a great deal more and makes a mess doing it.
Why the pre-drywall walkthrough exists
It is step ten of our twelve, and it is deliberately placed there. We walk through the house together to review every detail and confirm layouts, electrical, plumbing, HVAC and upgrades — while all of it is still in plain sight.
Up to this point you have been reading drawings. A floor plan is an abstraction, and almost nobody can feel a room from one. Standing inside the framed space is completely different: you can see how far the island really is from the sink, how much wall the sectional actually needs, and whether the window you moved six inches on paper landed where you pictured it.
Most of what comes out of this walkthrough is small. That is the point. Small and now, rather than small and later.
What you are actually looking at
Work through it in the order the trades installed it.
Electrical. This is where most changes happen, and it is worth being fussy. Walk each room and picture the furniture in it. Where will the bed actually go, and are there outlets on both sides of it? Is the switch on the side of the door your hand reaches for? Are there outlets where you will want a lamp, a charger, a vacuum in the hallway, a Christmas tree, a bathroom appliance you use every day?
Lighting. Fixture locations are marked and still movable. A pendant that is centred on the plan may not be centred on the island as built. Look up in every room.
Data, TV and speakers. Anything you want hidden in a wall has to go in now. Running it later means opening finished drywall.
Plumbing. Confirm rough-in heights and positions for taps, showers, and anything wall-mounted. Check that the laundry and any secondary sink are where you expect.
HVAC. Look at where the supply and return runs actually landed. A register in the middle of a wall you intend to put a bed against is easier to discuss now than in January.
Blocking. The quiet one people forget. If you plan to hang a TV, mount grab bars, install floating shelves or fix a heavy mirror to a wall, the backing has to go in before the drywall. There is no way to add it afterwards without cutting the wall open.
Openings. Confirm door swings, and that window sizes and positions match what you approved. A door that swings into a light switch is a small annoyance you will notice every day for twenty years.
What this walkthrough is not the time for
Being honest about that is more useful than pretending the door is wide open.
Structural changes are a different conversation. Moving a bearing wall, changing a roof line or enlarging a structural opening at this stage means going back to the designer or engineer, and potentially back to the municipality for a permit revision. It is not impossible. It is a schedule and cost event, not a walkthrough item.
Anything that changes the approved drawings in a way the permit covers has to go through the proper channel. That is exactly why the earlier steps exist — the preliminary plans, the 3D renderings and the design work are where big changes belong, and they are cheap there.
Finishes are also not this meeting. Cabinets, countertops, flooring, lighting fixtures and millwork are selected with our interior design team, and exterior materials in the Design Centre at our model home. Those run on their own track, and how far the finishing goes is a separate decision again — see turnkey or finish it yourself.
How to get the most out of the hour
Bring the furniture plan, even a rough one. Bring a tape measure. Bring the list of things you have been meaning to ask about, because you will not remember them standing in an empty shell.
Walk the house twice: once quickly, to get your bearings, and once slowly, room by room, with the list. Take photos of every wall before it is closed. Six months later, when you want to hang something heavy or find a wire, those photos are the only record of what is behind the drywall — and they are worth more than most people realise.
And say what you are thinking, even if it sounds minor. The whole reason we do this together is that the person who will live in the house notices things the person who built it does not.
How A&R runs it
Our part is to have the house ready and the right people there. This is the stage I coordinate — framing through completion, managing trades and schedules — so the walkthrough happens once everything is genuinely in and before anything is covered, not squeezed in after the boarders are booked.
It sits inside a process built so nothing surprises you: twelve steps from the first conversation to keys in hand, with planning and permits handled for you and a final walkthrough before possession. Every build comes with a 7-year Tarion structural warranty, manufacturers’ warranties and our own 1-year builder warranty.
We have been doing this in Central Ontario since 1973. If you are planning a build and want to know what the process actually looks like from the inside, tell us about your project — we reply within two business days.
Frequently Asked Questions
When does the pre-drywall walkthrough happen?
Once framing, electrical, plumbing and HVAC rough-ins are complete and inspected, and before any insulation or drywall goes up. It is step ten of our twelve-step process.
Can I still change things at the pre-drywall walkthrough?
Small things, yes — outlet and switch positions, fixture locations, blocking for anything you plan to mount, and low-voltage runs. Structural changes are a separate conversation because they may require the designer, the engineer and a permit revision.
What should I bring?
A furniture plan, a tape measure, your questions, and a phone for photographs. Photograph every wall before it is covered; it is the only record of what is inside it.